Despite being aware of the importance of stretching, many runners do not incorporate this into their routine or perform it correctly, regardless of the time they allocate for loosening up their muscles.
The changing thinking on stretching, such as the debate on whether it’s better to stretch before or after a run, adds to the difficulty.
The guidance on the type of stretching has changed, with a focus on dynamic movements rather than the static bend-and-touch-your-toe type. However, many runners may still stick to their old stretching routines from their track team days.
It is never too late to begin stretching, or to begin doing it correctly, which is the good news. Taking advantage of the current running renaissance brought about by the pandemic, now is an excellent opportunity to improve one’s stretching technique.
Why is it important to stretch before a run
It is important to allow muscles preparation time before suddenly increasing their activity, such as going for a run.
When we sit down, a lot of our muscles become contracted or shortened due to the position. However, when we run, these muscles are stretched. If the transition from sitting to running happens too fast, there is a possibility of injury since a muscle that has been pre-stretched can handle and withstand stress more effectively than an unstretched one.
Should you stretch before every run
Yes, it is crucial to engage in some form of stretching before running or engaging in any exercise. This is important to prevent injuries and enhance the effectiveness of your workout. However, the term “stretching” encompasses various types of exercises.
Ideally, include dynamic activity in your pre-run warmup that mimics the movements of your workout. This helps gradually stretch the muscles in a controlled way. These activities can be performed before beginning your run or after a gentle jog of five to 10 minutes.
What is dynamic stretching and why is it better than static stretching before a run
When recalling gym class, you probably recall static stretching. This involves bending over to touch your toes or extending your arm across your body to stretch your shoulder. Usually, these stretches are maintained at the stage of slight unease for a minimum of 30 seconds.
We have discovered that performing a static stretch prior to any activity does not produce the intended outcome. Consequently, it does not effectively prevent injuries and may potentially hamper workout performance, as supported by some evidence.
Dynamic stretching, however, entails carrying out gentle repetitive movements that progressively enhance motion, circulation, and muscle length.
An example of arm swings is when they begin with small motions and progressively increase in size, always staying within the normal range of motion. This helps to mimic the upcoming activity, like running, by stretching the muscles and enhancing blood circulation in those specific areas.
Why is it important to stretch both sides of the body
To prevent both overuse and acute injuries, it is crucial to maintain symmetry in the movement and strength of the body. It is vital that both sides of the body exhibit identical movement patterns, such as a running gait or weight-lifting motion, in order to achieve a uniform and consistent movement.
Essential pre-run stretches
1. Side lunge
To maintain the same meaning while rephrasing the text step by step: 1. Assume a stance wider than your hip/shoulder width, but not so wide that you experience stretching. 2. Keep both feet pointing forward as you bend your left knee, allowing your hips to move backward. 3. Transfer your weight onto your right foot while stepping to the right.
Begin by keeping your upper body in an upright position and engaging your core muscles as you move. Afterward, return to a standing position. Repeat this sequence ten times before switching sides. This exercise specifically focuses on the hip abductors/adductors and activates the core stabilizing muscles.
2. Glute and piriformis activation
To experience a stretch, begin by standing tall and evenly distributing your weight. Transfer your weight to your right leg and elevate your left ankle. Directly position your left ankle over your right leg, resembling a seated cross-legged posture. Use your hands to hold onto your left ankle and perceive the stretching sensation.
Begin by holding your left ankle for about three seconds before releasing it. Then, proceed to perform the same action on your right side. Repeat this process, switching legs, while walking at a slow pace for a distance of 25 yards. This exercise specifically focuses on the gluteus and piriformis muscles. Finally, move on to performing arm swings.
To begin, stand in a stable position and use both arms simultaneously, resembling a windmill. Initiate the swinging motion by moving the entire arm upward directly in front of you, followed by moving it around to your rear. Initially, perform small circles and gradually build momentum, progressively expanding the size of the arm swing.
For a duration of 30 seconds, gradually adjust the angle of your swing to be more in front of you. This movement specifically aims at stretching the muscles in your shoulders, chest, and upper back, which are crucial for arm-swinging while running. This stretch is referred to as the bent-knee forward swing.
1. Position yourself next to a wall or fence to provide stability. 2. Ensure that your right leg is firmly planted on the ground. 3. Proceed to raise your left knee in front of you, forming a 90-degree angle. 4. While maintaining forward-facing hips, lift the knee toward your chest and then extend it straight back. 5. Repeat this motion 10 times before switching to the opposite leg. 6. By following this exercise, you will effectively engage your hip flexors. 7. Additionally, incorporate five sets of straight-leg lateral swings into your routine.
To start, position yourself beside a wall or a fence to provide support. Ensure stability by standing on your right leg. Next, raise your left leg and swing it outward to the left. Then, smoothly and fluidly bring it across your body towards the right side, in front of you. Make sure to keep your hips facing forward throughout. Repeat this sequence 10 times, and then switch legs. This exercise specifically focuses on targeting the hip abductors and adductors.
6. Arm circles
To loosen up your arms and shoulders, begin by making the largest circles possible. Perform six full circles in both directions, starting with one arm and then switching to the other.
7. Leg raises
To activate your hip joints, follow these steps: take a deep breath, raise your arms upwards, and carefully lift one leg until your thigh is parallel to the floor. Repeat this action five times on each side.
8. High kicks
First, stand tall and lift your right leg up towards your hip, ensuring that your leg remains straight. In addition, simultaneously lift your left arm as if you are about to make contact with your right foot. Perform this action on both sides for a total of 10 repetitions.
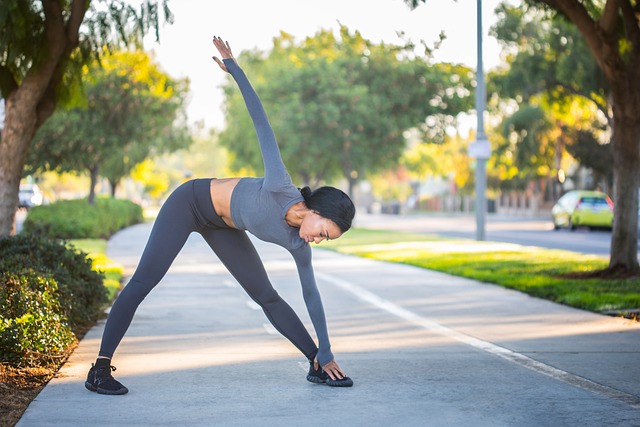
9. Forward bend
To perform the exercise, begin by spreading your legs with your toes pointing forward and keeping your knees straight. Next, shift your left hand towards your right foot. Afterward, return to your initial position and then move your right hand towards your left foot. Repeat this sequence a total of ten times.
10. Plyometric lunges
To perform the exercise, begin by lunging with your left foot while simultaneously angling your right arm upwards. Proceed by explosively jumping up, bringing your right leg forward, and shifting your left leg backward to land in a lunge position. Repeat this sequence for 15 repetitions in 3 sets.
11. Glutes
Start by sitting on the roller with your hands for support, and cross one leg over the other. If this becomes challenging, you can put your leg down. Proceed to massage your glutes by moving back and forth while on the roller.
12. IT band
Begin by lying on your left side and using your left forearm to support your upper body. Position the roller underneath your left thigh and proceed to roll back and forth. As you initially start, transition to your right side after completing ten repetitions. As you become more skilled, increase the number of repetitions.
13. Upper back
To begin, lie down on the floor while bending your knees and folding your arms over your chest. Position the roller underneath your back and lift your buttocks. Proceed to roll gradually between your tailbone and shoulders, ensuring to focus on any areas that feel tight.
14. Quadriceps
To perform this exercise, start by lying on your stomach and placing the roller beneath your thighs. Support yourself using your lower arms, and begin rolling up and down your thighs. You have the option to alternate between one side and the other, or perform the exercise on both legs simultaneously.
15. Calves
To begin, position yourself on the floor with your legs extended and place a roller underneath one of your calves. Proceed to move your body back and forth by using your hands to roll. Remember to engage your stomach, back, and buttocks muscles. Additionally, feel free to apply some gentle pressure with your other leg.
Should you stretch after your run, too
In an ideal situation, yes. When exercising, the heart rate increases to supply muscles with oxygen. Stretching allows the heart rate to slowly decrease and return to its normal pace. Additionally, after an intense run, muscles will contain lactic acid.
By stretching, the blood flow to the muscles is enhanced, consequently getting rid of lactic acid and enhancing recovery. In addition, stretching after a run aids in relieving tight muscles caused by exertion, thus helping to prevent discomfort and stiffness later on.